p3: Bagels

#24, Bagels

fresh-baked-bagels-4268-lgI’ve been wanting to do a recipe for bagels for quite a while, we’ve been stocking them more often in the pantry again, always a favorite breakfast snack! But there have been two distinct notes of opposition preventing me from doing this: first, of course, find a couple day period to spend making them, a pain when one keeps getting distractions or days that make you just not want to do anything. But the second, and bigger issue, is my recipe book’s requirement for “High Gluten Flour.” And no, this doesn’t mean just bread flour, high-gluten is a step higher than that and apparently instrumental to making those perfectly chewy bagels.

But apparently no one has it in stores, at least not the ones I’ve tried near me, and it is flipping pricey to buy online JUST for a bag of flour. So the thought was doomed, left to be procrastinated on for who knows how long. Thankfully, though, I ended up catching an episode of America’s Test Kitchen where they made, gasp, bagels! In it they DID use bread flour, or mentioned it was still a viable substitute for their recipe, helping get my brain back on track to the idea of making these holey goodies. Found a recipe online that actually STARTED with the ATK recipe but made his own manipulations to get an end result that was a little more classic and refined [plus without all those extra little odd steps they do in the show, which makes an awesome recipe yes but not a very classic one].

20160217_002101A few notes, this IS one of the bread recipes where, much like pretzels, the proofed dough is dunked into a boiling water solution mixed with baking soda to gelatinize the outer layer for an even thicker and distinct crust after baking. The dough itself is made VERY firm and stiff; it is highly advised you do NOT try to man up to knead it and just use a stand mixer instead. Because even THOSE will be struggling to whip it around. And I mentioned the special ingredient of high gluten flour, but there’s another one: Malt Powder or syrup. Apparently they’re used as the sweet aspect in lots of bagel recipes, both for the yeast to eat and to add an additional edge of flavor to the final product [likely a continued nod to the older times where some bagel makers just used some cheap available leftover materials from their or other beer making]. The powder itself is sort of in the same category as the flour, likely needing to order it, but one can find Barley Malt Syrup rather easily in stores, which I LOVE using by the way. For anyone who’s made beer and had to start out using the syrups and powders alongside the malt, they know the concentrated almost-molassasey goodness that this offers! Need to find some other cool things to mix it into… oh, and fair warning, this mofo is STICKY as all hell. No matter what it will not just fall off anything naturally, so be warned with pouring!

Recipe 20160217_001752 
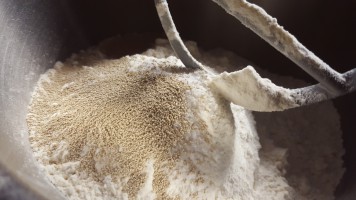
6 cup High Protein/Gluten or Bread Flour
2 ¼ tsp Dry Yeast
1 Tb Kosher Salt
1/3 cup + 1 Tb Barley Malt Syrup or 2/3 cup Barley Malt Powder
2 cup Hot Water [88-100F]
1 Tb Baking Soda
Desired Toppings, if any
Egg White Wash [if topping]

Directions

  1. Combine Flour, Yeast, Salt, and Barley Malt Powder [if using] in stand mixer20160217_002316
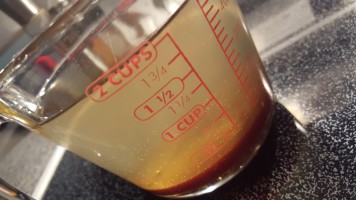
  2. If using 1/3 cup Barley Malt Syrup, mix with Hot Water to dissolve, slowly streaming into the flour mixture while mixing on low speed [using paddle attachment]20160217_002608
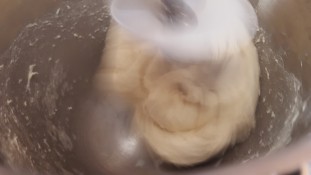
  3. Once all loose flour has come together into a single mass, exchange paddle for dough hook and start beating around the dough on medium speed20160217_002739
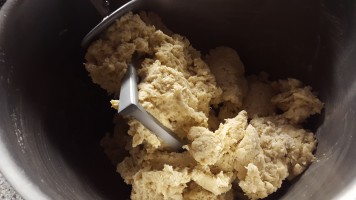
  4. Mix for at least 10 minutes, and yes your mixer WILL be working hard to do this, until your sturdy dough is smooth and elastic20160217_004341
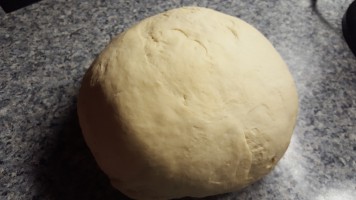
  5. Plop this on counter, loosely covering with plastic wrap or damp towel, and let rest at least 5 minutes to relax20160217_011256
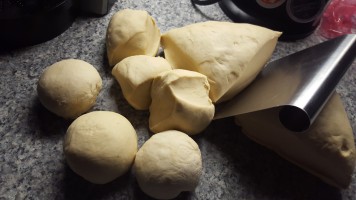
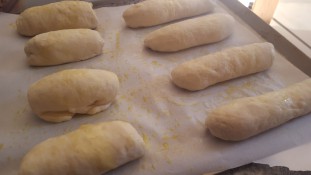
  6. Divide into 12 even-sized pieces. Placing a piece between your palm, fingers bent like a claw, and the counter surface [or if it has NO traction like my counter, your other palm], roll the dough rapidly in circles until it forms a smooth boule. It can help to tuck parts of it into the back like with regular boule-making technique at first
  7. Take each ball, gently pushing a hole straight through the center with your finger/thumb, and begin working this hole out to at least 1½” wide by slowly turning and pressing evenly with your thumb [that whole “spinning around your finger” trick probably DOES work, but only if the dough is absolutely perfect to start out with]. Alternately, one can roll the dough into an even log and wrap around your palm, re-connecting the ends into a perfect circle. Good luck20160217_013512
  8. Transfer to cornmeal-dusted pan, cover with plastic and move to refrigerator overnight20160217_115621
  9. The next day, take dough out and prepare your water bath. Combine 1 gallon water, the 1 Tb Malt Syrup, and Baking Soda, bringing to a boil20160217_120518
  10. Dip 3-4 doughnuts into the water at a time, leaving to boil on one side for one minute before turning over for another minute20160217_121003
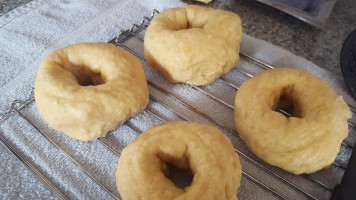
  11. Transfer to a cooling rack to drip for a bit and then to another cornmeal-lined baking sheet and repeat with remaining dough. As this is going, preheat oven to 450F20160217_122514
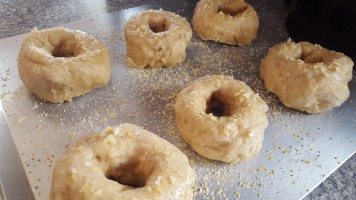
  12. If sprinkling any toppings [I myself used a Lemon Flake Sea Salt on some], brush the tops and sides of your bagels with Egg Wash [1 tsp of water mixed w/ one egg white vigorously], then sprinkle as generously as desired, patting ingredients down and into it afterwards20160217_124754
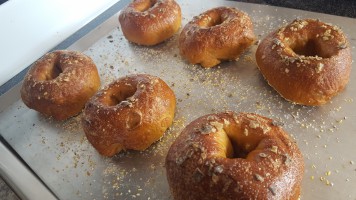
  13. Move into oven, baking at least 15-20 minutes, turning 180 degrees halfway through cook time
  14. Once deep golden brown and baked through, remove20160217_124805
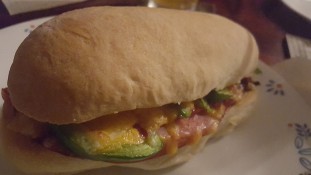
  15. Let cool half an hour before use or, if you’re cool, cut open immediately and cover those hot insides with butter and/or a schmear of cream cheese
  16. Enjoy

20160217_154230What Have I Learned This Time?

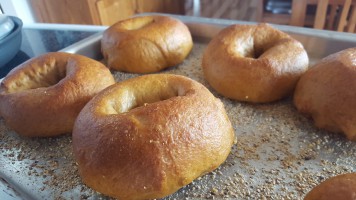
That I still need more work with shaping, these bagels were a pain trying to keep even and ‘perfect’ looking. At least those rough edges softened up by the final product through proofing and baking, but I may have to try the ‘roll and wrap’ technique for shaping if I ever do this again.

Bagels definitely do NOT need egg wash if there’s no topping; I much prefer their color when baked as-is, the others made me nervous of being in too long.

The benefits of using a slightly damp towel when resting certain doughs; the bagel dough definitely started to get one of those firm skins on parts of it before shaping, which made the process itself that much more difficult. I feel like it developed one rather fast too. Sadly I hadn’t noticed the ‘damp towel’ instruction in the recipe [and it might have just been in another one that I read earlier actually], but it definitely would have helped here.

Any Thoughts?

The end result comes reminiscent of pretzels… not surprising given the similar boil-bath before baking. Big, chewy, and for once with a crunchy exterior when eaten close to fresh, it’s a good version of a bagel. Can’t wait to try one in New York in a month or so to do a proper comparison.

Does the Dough Like Me Yet?

It still thinks I need to work on my massage technique…


p3: Cheesy White Loaf Bread

#23, Cheese-ish White Loaf

Garlic-Cheese-BreadI was requested to do some bread baking this past weekend to go with a Chicken Dumpling Soup family dinner. Didn’t feel like doing anything special, just a simple fresh baked, hot loaf Milk Bread would be AWESOME, so I never even thought I’d do a blog post on it. But then the idea got in my head to make it a bit different, try a little experiment if you will. See what happens if I add some cheese in the bread, both directly and sprinkled in before rolling. Sounds tasty, still fits the occasion, and IF it works out well enough then I have an excuse to do some writing. Clearly it didn’t backfire so immensely, so here I am. Didn’t use any special cheese, just some mass-produced shredded ‘monterey-like’ thing we keep in the fridge on hand, but it worked for now.

Recipe
2 tsp/0.22oz Yeast
1 5/8 cups/13oz Milk, Lukewarm
4¾ cup/21.5oz Bread Flour
1½ tsp/0.38oz Salt
¼ cup/1.33oz Powdered Milk
3¼ Tb/1.66oz Sugar
2 large Eggs
3¼ Tb/1.66oz Butter, room temp or melted
½-1 cup Shredded Cheese

Directions

  1. Bloom Yeast in the Milk at least 5 minutes, until soft a starting to lightly foam/bubble20160124_123020
  2. In a stand mixing bowl, mix together the Flour, Salt, Powdered Milk, and Sugar, followed by the yeasted milk, 1 Egg, and Butter20160124_123141
  3. With a paddle attachment, stir on low speed [may want to pulse initially] until it all comes together in a ball
  4. Switch to dough hook, increasing mixing speed to medium, letting it go for about 4-5 minutes until almost completely kneaded, adding any extra flour to make sure the dough clears the sides while sticking just slightly to the bottom of the bowl20160124_123718
  5. When it ALMOST clears the windowpane test, add in about half or more of your shredded cheese, letting it go until fully incorporated20160124_123947
  6. Transfer to lightly-oiled bowl, covering tight with plastic wrap and leaving to ferment 1½-2 hours, or until doubled in size20160124_141918
  7. Remove and shape into a nice, tight, smooth Boule. Mist lightly with spray oil, loosely cover, and let rest on the counter 20 minutes for glutens to relax and more fermentation20160124_142130
  8. Start to shape this into a loaf by pressing and pushing into a large, rectangular shape, pressing down with fingers to de-gas as one does so. Sprinkle thoroughly with most of the rest of your cheese20160124_144303
  9. Roll up, pressing the edge tightly with each turn to stretch the dough taught. Once rolled completely and tightly sealed, transfer to your loaf pan. Spray with oil, loosely cover, and proof one to one and a half hours or until doubled once more20160124_144502
  10. Preheat oven to 350F
  11. Vigorously beat your other egg with a teaspoon of water to make an Egg Wash. Brush this over the top of your risen dough, sprinkling with some more cheese to top20160124_154916
  12. Transfer to oven, baking about 35-45 minutes, turning halfway through, or until deep golden brown all around and gives a hollow sound when thumped on the bottom20160124_163605
  13. Leave to cool for an hour or more on a rack before slicing and serving as desired
  14. Enjoy

20160124_164145What Have I Learned This Time?

That my prediction of what would happen with the cheese-sprinkled-before-rolling technique was spot on; I figured there was a good chance it would create a little gap, so I’m glad I controlled the final amount like I did. That said, MORE CHEESE needed; it sadly didn’t come out as much as I wanted, so I need to add more INTO the dough. It seems like it could easily take more, as the final result even with the ¼-½  cup I had in there didn’t really affect the texture. Obviously a better, stronger flavored cheese would work better too.

There ARE notable results to forgetting the salt… which yes, I accidentally did here. Structure and quality wise it’s just as good, the same. But I did notice that the dough seemed to be ready with its fermenting/proofing periods earlier than stated. Not to mention the bread TASTED rather plain and ‘underseasoned.’ Still good of course, especially with butter and while warm.

20160124_163540Found a decent way to keep the bread warm for an extended period if needed [such as waiting for dinner]. Loose aluminum foil wrapping and inside the warm oven, actually didn’t negatively affect the product, at least not in any significant way that I noticed.

And finally, there actually IS such as a thing as too much dough in these recipes for my loaf pan; I probably should have cut a bit off for a separate bake like I usually do. Clearly one can see the overextending sides, which still baked up nice and well, but interestingly enough I found issues removing it from the pan for the first time. Some of it stuck to the sides and bottom, thus I didn’t care as much about cutting into it while still hot as the solidity was already ‘compromised,’ though questions still about as to how much this issue had to do with the cheese inside. Either way, good to know that I SHOULD ensure it keeps to the similar limit as I’ve randomly done before.

Any Thoughts?

The crust was awesome. Even after sitting it out for a while it stayed nice and crunchy. And the cheese sprinkled on top! Truthfully it was sort of right at the edge of ‘too much,’ and certainly wasn’t like ‘extra cheese’ and more like ‘cheezit/baked cheese cracker’ flavors, which is fun as a crust.

Does the Dough Like Me Yet?

Seems to prefer the comfortable ‘safe zone’ in this relationship and isn’t quite ready for kinky experimentation… YET.

p3: Challah

#22, Challah

saffron-challah-loavesThere are two classic breads whenever one looks into the ‘enriched varieties;’ you know, the ones that have extra butter, milk, and/or eggs to make a richer and tender-crispy product. Of course Brioche is the first, and I gotta love making and eating them. Then there’s Challah, the braided wonder famous for its importance in Judaith traditions, eaten purely on the Sabbath. I mean, unless you’re like me and just want to eat it whenever you want. For instance, when I need something awesome to make an Almond French Toast for my Mother’s Birthday Brunch. I’ve bought it before from a store [and lucky for me I didn’t realize they only sold it on Friday, which is the day I HAPPENED to make it in and got the last loaf], but now I get the chance to make it myself!

Note that the recipe which follows will be for a simple 3-braided style loaf shape; there are quite a few others, including 4-braid, 5, and even higher which all have their own specific techniques to making the braid. I’ll probably try them out in the future should I ever attempt any other challah or braided loafs [hopefully!], but just letting you know for now.

I’d write more but I’ve been so busy with other things lately I don’t have anything else I really want to say here…

Recipe
4 cups/18oz Bread Flour
2 Tb/1oz Sugar
1 tsp/0.25oz Salt
1 ½ tsp/0.18oz Yeast
2 Tb/1oz Vegetable Oil
2 whole/3.3oz Eggs
2 whole/3.3oz Eggs, Yolks and Whites separated
7/8 cup/7oz Water, Room Temp
Sesame, Poppy Seeds, or anything else desired for Garnish

Directions

  1. Combine Flour, Sugar, Salt, and Yeast in bowl of stand mixer20160102_112732
  2. Separately, mix Oil, the 2 Eggs, 2 Egg Yolks, and Water until consistent, pouring into the dry mixture20160102_112841
  3. Mix on low speed, with paddle attachment, until everything congeals and forms into a ball; add more water if needed20160102_112854
  4. Switch to dough hook and let mixture run on medium speed around 6-8 minutes, adding more flour if sorta sticky, until it forms a smooth, supple mass and passes the windowpane test20160102_113626
  5. Roll into ball and toss in a lightly oiled bowl, turning to coat. Cover with plastic wrap and bulk ferment 1 hour20160102_113750
  6. At that point, punch or knead the dough down to de-gas, reforming into a ball and returning to covered bowl for another hour or until doubled in size20160102_135231
  7. Divide dough into 3 equal pieces, form into a Boule as shown Here and let rest on counter about 10 minutes20160102_135634
  8. Roll out each ball into as long and thin of a log/strand as desired, simply making sure that it’s somewhat thicker in the middle and thinner on the ends20160102_141810
  9. To shape loaves, lay each strand parallel to each other, and ideally vertical to you to discern a ‘right and left’ side. Take the end of the outer right leg, crossing it over the one to the left so that they’re crossed in the middle and the end is between the other two. Now take the outermost left strand and cross it over the now middle strand. Repeat where the end of the outer right is going over the middle and then with the left, until the ends meet up20160102_142156
  10. Do the same pattern with the OTHER half, only crossing underneath instead of over. Finish by pinching the ends closed20160102_142410
  11. Take egg Whites, beating well until frothy to make an egg Wash
  12. Transfer braid to parchment-lined sheet, brushing with wash and lightly spraying with oil before giving a loose cover of plastic or cloth. Proof 60-75 minutes or until doubled in size20160102_143244
  13. Preheat oven 350F
  14. Brush loaf once more with a coat of egg wash, sprinkling with Seseame/Poppy Seeds [or in my case, crumbled almonds]20160102_154743
  15. Bake for 20 minutes, turn 180 degrees, and then 20-40 minutes more depending, until it’s achieved a rich golden brown color and sounds hollow when thumped20160102_163051
  16. Remove and cool on rack at least an hour before serving. Enjoy

20160102_163120What Have I Learned This Time?

Apparently I need to find instructions on bread braiding that actually goes into proper detail on it. As you can see from my pictures, my loaf didn’t quiiiiiiieeete come out as pretty as a classic braid does… it has a cool shape, mind you, but not a proper braid. Figured out the reason though; the book I based this off has you label the ‘ends’ of each dough log 1, 2, 3. It says cross 3 over 2, then 1 over 2, then repeat. What it DOESN’T say is that when you cross one over the other, it then turns into 2 and the numbers switch so it’s always 1-2-3. So I kept trying to cross things over the main one and it didn’t turn out well for half the loaf.

Also, need to find a better way to make those dough logs/ropes… god it didn’t want to co-operate at all…

Any Thoughts?

20160102_175244I wish I hadn’t forgotten to take pictures of the awesome-as-hell Amaretto French Toast that I made with this… I mean damn it was good. Though, on its own, having a bite with just that bit of toasted almond on top was just nutty goodness. Oh, and I absolutely love this fresh from the oven; the crust is delightfully crunchy and toasty, perfect with that slightly-enriched center. I forgot how much lighter it was compared to brioche, so a bit of butter definitely brings it to awesome heights [I don’t care if it’s kosher or not! And I’m too lazy to find out!]. I sort of want to make it again as a fun all-purpose bread, especially to practice my braiding techniques, and use different oils and things to see how it affects the final outcome.

Does the Dough Like Me Yet?

The dough? Yes. In fact, I think it loves me like family now. The whole braiding technique thing isn’t impressed though… I’ll have to bring it chocolate and flowers next time.

p3: Cinnamon Raisin Walnut Bread

img_6469-version-2#21, Cinnamon “Raisin” Walnut Bread

I’ve had the house to myself for a while, need some loaf bread around, and it’s the holiday season so I’ve got to make something at least semi-suitable. Well truthfully I just wanted to make something simple, like a loaf bread, that I could turn into a project article and didn’t feel like doing any of my past recipes. And as I’m flipping through the book, I come across a recipe that I had completely forgot to take under my wing; I planned on making it at an early point but had yet to get around to it. Considering the time of year and need for something a bit simple, it seemed right to make a big loaf of Cinnamon Walnut Raisin Bread for the house; good on its own and interestingly versatile in the sandwich game. Not to mention I DID just recently receive a bag of organically small-farmed walnuts… had to crack the damn things myself, took two days, but they were worth it!

Thoug20151206_114957
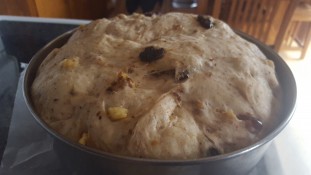
h of course I don’t actually HAVE any raisins… which is why we improvise, there being quite the simple solution here. It WAS a good way to use up all the leftover dried fruit I had from my yearly fruitcake making. With luck, my mixture of dates, figs, dried apples and walnuts, matched with this homemade recipe, can put the many horrible memories of childhood daycare cinnamon bread ‘snack times’ to proper shame.


20151206_115043Recipe
3½ cups/16oz Bread Flour
4 tsp/0.66oz Sugar
1¼ tsp/0.31oz Salt
2 tsp/0.22oz Dry Yeast
1¼ tsp/0.16oz Cinnamon
1 Large Egg
2 Tb/1oz Butter, room temp
½ cup/4oz Buttermilk or Whole Milk, room temp
¾ cup/6oz Water, room temp
1½ cups/9oz Raisins or other Dried Fruit [chopped if large]
1 cup/4oz Toasted, Chopped Walnuts

Directions

  1. Stir Flour, Sugar, Salt, Yeast, and Cinnamon in stand mixer bowl20151206_115658
  2. Add Egg, Butter, Buttermilk, and Water, mixing on low until everything comes together in a moist lump20151206_120803
  3. Switch to a dough hook and mix on medium, adding flour as needed if dough is too sticky, until it starts to get soft and pliable20151206_121036
  4. When it seems close to done, about 6-7 minutes-ish, add in Walnuts and your Dried Fruit of choice, mixing until everything is fully incorporate and fully kneaded, 1-2 minutes20151206_121852
  5. Transfer to oiled bowl, covering with cling wrap and bulk fermenting at room temp up to 2 hours, or until doubled in size20151206_141824
  6. Divide dough in 2 equal pieces or use it all for a bigger loaf, dimpling down to briefly degas before shaping into a loaf as directed Here. Place the shaped dough into a thoroughly oil-misted loaf pan, loosely covering with plastic20151206_142228
  7. Proof 60-90 minutes, until nearly doubled in size and risen above the edge of the pan
  8. Heat oven to 350F, moving the loaf pans on a sheet tray for baking20151206_153341
  9. Cook for 20 minutes, rotate 180 degrees, and continue for a further 20-30 minutes until golden brown and hollow sounding when bottom is thumped
  10. Remove from oven and pans, placing bread on cooling rack for at least an hour before eating
  11. Slice and enjoy!

20151206_212936

What Have I Learned This Time?

I think I’ve noticed a trend in the fruit+nut-filled breads, mainly in the definite need for one to fold in as much mix-ins and other flavorings as possible. Truly they’re the main performers, for in all cases I’ve found so far the bread ON ITS OWN, if tried fruit-free, has felt very much on the plain/boring, if not even under-seasoned side. In the future, I believe I can improve this by increasing the salt additions for flavor, really felt like it needed it here alongside more cinnamon, but it’s just an interesting pattern of note. Though I’d bet a proper Panettone might be pretty darn good on its own… but there ARE always exceptions to every situation. But the main thing I took from it is that, in these recipes from here on out, I want to try to maximize the workable amount of mix-ins to as high as I possibly can without ruining the composition. If anything, it’ll just be awesome loading them up with goodies.

I’m not sure if this counts in this area, but after looking through pictures, it seems as if many a cinnamon-bread has a distinctive swirl going through it. That wasn’t achieved here, and I’m wondering if that is best done through rolling it even tighter, to create more ‘layering,’ or if I should just try dusting it with cinnamon before shaping a-la Caramel Rolls. Hopefully I’ll get to try.

Any Thoughts?

Not really… though I did REALLY enjoy the distinctly crisp texture on the outside. Not sure if it was natural with the bread or if I ended up over-kneading it, but I liked it! Money’s on the sugar addition helping it out though.

And yes, before those who’ve read these posts before [rare as you may be], I did end up forgetting to take a couple pics after it was baked.

Does the Dough Like Me Yet?

It turned a bit ugly, but I think the fruit made sure the loaf bread is still sweet on me.

p3: Hoagie Buns

#20, Hoagie Bun

Hoagie-RollsSo this particular installment of the ‘bread battling project’ had an interesting inspiration and twist. Had a plan for a Sunday night dinner+shows evening with sis and friend, to which she shared the idea of this ‘philly cheesesteak lasagna’ recipe beforehand with notes saying how we should make this for our night of fun! So, in figuring out what I could make that would go along with it, and while keeping to one of my project needs, I came along what I still think is a rather brilliant idea. Why not make garlic bread… out of Hoagie Buns/Rolls!? Still have the cheesesteak theme, but it’s also a typical side with lasagna, win-win!

But of course the steaky-cheesy-pasta casserole didn’t get made, apparently it was an idea for ‘some potential weekend’ and not THAT one, so I had leftover hoagie buns that needed to be used before all going stale. Which is fine though, because we made sandwiches with them anyways… some pretty damn good quiznos-style griddled ones too.

It’s always nice playing with simpler bread styles every now and then I find, don’t have to think about making sure that I add in a new ingredient properly, worry over degassing too much in some intense shaping process, or all the hassle of trying to hearth bake perfectly in my home oven setup. Just yeasted water, flour, other stuff, knead it right and make sure I shape it to what it should look like and don’t over bake. Lets you get more used to basic techniques and also see where you REALLY may need work, and where you’re doing well so far.

As for the hoagie recipe itself, there’s not much to say. There are various ones which shift in proportions back and forth, as practically all bread recipes tend to do depending on who’s making them. But what stood out to me was the addition of sugar and butter; nowhere near enough as a fully qualifying ‘enriched dough,’ but still more than other bread can be. The sugar itself really seems to play a role here, with enough to kick that yeast into high gear, definitely a one-day bread designed for the quick and easy requirements needed by sandwich makers everywhere. Also, this particular recipe was listed officially as “Soft and Chewy Hoagie,” which I’m not sure if that’s supposed to distinguish it from OTHER hoagie recipes out there or if that’s simply the natural aspect to the bread. What I CAN say is that it’s basically the same as a white dinner roll… in all the best ways.

Recipe
1 Tb Dry Yeast
2 Tb Sugar
1 3/8 cups Warm Water
4 cups Bread Flour
1 tsp Salt
3 Tb Butter, cubed and soft

Directions

  1. Mix Yeast, Sugar, and 3/8 cup Water in stand mixing bowl, leave for about 5-10 minutes to bloom20151018_101206
  2. Once bubbled up noticeably, add in Flour, Salt, and remaining water20151018_101708
  3. Using dough hook, mix on low a few minutes, until everything mostly comes together20151018_102029
  4. Increase speed to medium, whipping and mixing for at least 5 minutes, adding any further butter or water as needed to get a soft, smooth dough, working until it can pass the windowpane test20151018_103649
  5. Add Butter a bit at a time, mixing until it’s fully incorporated and dough comes back together20151018_103938
  6. Transfer to oiled bowl, covering tightly with plastic wrap20151018_104014
  7. Leave to bulk ferment 30-60 minutes, or until doubled in size20151018_114303
  8. Remove, kneading or pocking down to de-gas, and divide into 8 pieces, or more/less depending on desired final size20151018_114426
  9. Shape into Batards as described Here20151018_115605
  10. Transfer to sprayed, parchment-lined tray, mist top with spray oil and cover lightly with plastic20151018_145408
  11. Proof for 30-45 minutes, or until about doubled in size
  12. Heat oven to 375F and when ready, uncover buns and move inside, cooking on tray 20-30 minutes, or until browned nicely from end-to-end and sounds hollow when bottom is thumped20151018_160822
  13. Remove, transferring bread to cooling rack, and let sit at least 20 minutes before use [or enjoy like hot rolls from the oven and slice immediately to drown in butter!]
  14. Slice horizontally down the middle and fill with whatever you desire!20151018_193642

What Have I Learned This Time?

Intensive de-gassing after the fermentation period won’t affect how much it proofs, so I should feel more confident in letting myself do this with other future breads in the hope of getting a more ideal structure.

Need to work more on my shaping skills for consistency, wish I knew some proper ‘tricks’ to it… maybe I’ll google it some on my next project. But more realistically, it’s probably going to have to come through repetition and practice. So whenever I start making more than one loaf of bread every week or so.

20151018_193942And finally, that these make the simplest, most satisfying and guilty-pleasure hoagie… spread bread in half, pile with desired meat, veggie, and sauce fillings. Cover it in cheese, making sure BOTH buns get a layer [or at least get butter and garlic on the other bare bread] and broil until… well… you see the picture. Tell me you don’t want to fold that and eat it, I dare you.

Any Thoughts?

Truthfully, I’m rather backed up on blog posts I have to get out, and I’m taking a nine-day-long vacation away from computer-access in a few days, so even if I COULD think of something to say here I’m not sure if I have the time! I swear I’m not trying to brag and sound snotty or anything!!

Does the Dough Like Me Yet?

It adores my appreciation to ‘what’s inside’ but still thinks I need a better fashion sense… ie it wants me to shape it better in the future.

p2: Basque Pumpkin Cornbread

The Sweet

downloadIt’s Autumn in Minnesota, we’re getting ever closer to Halloween and Thanksgiving, everyone is becoming unnaturally obsessed with ‘pumpkin spice’-flavored things, and my sister gathered us together last weekend for a family dinner of grilled pork and potatoes. So what better ‘dessert’ accompaniment for me to make than Basque Pumpkin Cornbread!? Yes, that is apparently a thing, as I found out while searching through the mountain of ‘classic French desserts’ I still had left on my Buzzfeed checklist.

Though, thankfully, my personal embarrassment for not knowing a lick about this particular item was short lived. It didn’t take me long to realize that, apparently, ‘French pumpkin cornbread’ is quite the ‘obscure’ recipe. There is ONE recipe for it online… one. I mean one can find other pages with it, but the recipe used is exactly the same; some blatantly display the fact it came from Lemons and Anchovies, the link which Buzzfeed itself uses (not that they have any other option). Any other recipes that try variations aren’t even relating themselves to the French recipe, or outright state they’re taking it and putting ‘American twists’ towards the bread, bringing it back to a classic US cornbread with pumpkin flavoring. But if you really want to understand just how random, for lack of a better term, this recipe is to French culture… I couldn’t even find any hint of it in my Larousse Gastronomique, THE definitive encyclopedia to French food, terms, recipes, culinary history, etc. And I checked EVERY term that would connect with it, even looking for its French name: ‘Meture au Potiron Basquais.’ Though I only found that in one blog post, of which could have been that particular author trying to make a name through his own direct translation. I would not be surprised if there was no other actual term given to this recipe by the French themselves, besides simply saying what it was not in English.

So that was an interesting thing to go through and realize as I attempted to search for other recipes which to compare to. But that’s not to say it doesn’t have history; for it DID get introduced to the southern part of the country at one point in time, it simply hasn’t had the luck to reach the fame and intrigue as their many other breads and pastries. The idea is that its creation developed after Christopher Columbus returned and introduced ingredients like Corn to the new world; of course starting in Spain and then spreading to Southern France first before the rest of the continent. Those in the shared Spanish-French Basque region turned the grain into a bread much like back in the Americas where they came from. Of course they had to put their own addition to it, mixing with rich seasonal squash while incorporating whipped egg whites, definitely a French introduction, as its sole leavening inclusion. Minimalistic by today’s recipes, but at that point an exceptional addition! Now it’s seeing if I can translate some of this exceptionalness into something that works today.

Chef’s Overdramatic Self-Centered Lecture Corner

20151010_211450So, I’ve gotta use an actual pumpkin with this one, just for the fun. Which, if you are yet unaware, does NOT mean one of those giant monsters we love to get for carving. Those are NOT food! They taste like crap, back away and save those for Halloween! One has to ensure that their store, which most Whole Foods and decent grocery stores should have, stocks the specific cooking varieties in the produce section. These are smaller squashes, their size and development made to concentrate their natural flavors and sugars. You know, so they taste good.

This solo recipe seems to only use the canned version, but assuming this IS something that was made semi-frequently in the past, it’d be with an actual pumpkin. And I want an excuse to roast a whole one! Though… as I found out, and you can see in my semi-recipe for ‘Roasted Pumpkin’ below, came out rather stringy, like spaghetti squash. So not quite that mashable; attempts at ricing and putting in my mini-processor failed. Should have just boiled the pumpkin instead, but I always prefer the flavor of roasting and thought it would result like a butternut. It’s an easy fix though, solved by re-heating the roasted pumpkin with the milk and blending, where it purees simply.

But it sucks because I originally planned to use a particular technique I learned with my bread-making adventures, whereby one makes a ‘soaker’ by combining cornmeal and water/liquid overnight. This helps to make sure the very dry and crunchy meal actually softens and yields a more tender final result; something I REALLY wanted to make sure happened this time as I was using a stoneground, ‘medium grind’ cornmeal; one I expect is likely bigger than the kind of cornmeal originally used in the recipe.

If taking the recipe like I did, using an actual pumpkin and roughly ground, delicious cornmeal vs the canned pumpkin ‘jello’ and a mass of processed maize flour, as I found out you’ll likely want to re-adjust certain proportions and procedures. You’ll see how I found this out later. Nevertheless, I’ve listed some notes in the recipe on the side if this is the case for your own adventures.

The ‘original’ recipe also called for Rum, which I chose not to use because… okay, I won’t like, I forgot the darn rum. Which I myself didn’t care about at first as it seemed like just a random addition; rum isn’t really much of a French ingredient except on that one Island. It made more sense to consider using an Armagnac, fruit brandy or something. Then I realized… Christopher Columbus, durnit. Of course there would be a connection to rum, it’s a dish that originated from overseas travel! Maybe rum wasn’t QUITE as vital to their crews in those very beginning days of runs between the Americas, but I can’t say it wouldn’t have been used in the dish now as a fun new ingredient. Sooooooo my bad.

‘Meture au Potiron Basquais’
1 cup Milk (+ ¼-½ when dealing w/ fresh pumpkin)
¼ cup Sugar
½ tsp Salt
1 cup Pumpkin Puree (1 ½ – 2 Fresh Roasted, Recipe Follows)
2 cups Cornmeal (if stoneground, medium grind, maybe a little less)
¼ cup/½ stick Butter
3 Eggs, Separated

Directions

  1. Turn oven to 375F20151011_151428
  2. Warm up Milk, Sugar, and Salt in sauce pot; if using actual Pumpkin, add in and bring to a simmer20151011_152655
  3. Blend until pumpkin is smooth, or whisk milk into puree
  4. Add Cornmeal, whisking in until smooth, ideally in stockpot to keep warm and encourage moisture absorption/softening20151011_152954
  5. Move to bowl, let cool a little, and stir in Butter so it gently melts
  6. Mix in Egg Yolks, making sure batter is only warm at the most20151011_154727
  7. Whip Whites until foamed, fluffy, and formed Stiff Peaks20151011_155013
  8. Fold into the batter, using 1/3 at a time, making sure it’s evenly distributed but minimally handled20151011_154221
  9. Thoroughly butter bottom and sides of cake pan or springform mold20151011_155239
  10. Pour into pan, transfer to oven, and bake 50-60 minutes, until set in the middle
  11. Remove, slide knife around sides, and carefully unmold from pan and onto cooling rack20151011_170226
  12. Let cool 10 minutes, cut into wedges and enjoy! Perhaps with some whipped cream or toasted meringue fluff20151011_201053

Roasted Pumpkin
1 Sugar Pie, or other sweet baking, Pumpkin
2-3 Tb Olive Oil

Directions

  1. Heat oven to 350F20151010_215500
  2. Carefully cut Pumpkin in half, scooping out all the seeds and ‘squash guts’
  3. Thoroughly rub oil over the top and inside of the pumpkin, placing it on a foil-lined tray cut-side-down20151010_220339
  4. Roast 1½ – 2 hours, or until a knife cuts in smooth and easily
  5. Remove, let briefly cool and scoop out inner flesh while still warm. Reserve for use20151011_001350

My Thoughts

Let’s start off with what went wrong. I couldn’t really taste any of the pumpkin, a side effect of using the fresh stuff vs the rather ‘concentrated’ canned paste, so I’d need to use much more next time if sticking to it. It also had that drier, crumbly cornbread-like texture; wasn’t horrible, but not that great for a dessert. Should have cooked it less, ideally found a way to have soaked that cornmeal like I planned, and/or used some more milk/less cornmeal in the final mix. But despite those tweaks, as cornbreads go it was still a rather nice bite, especially for such a simple recipe developed from what would have been made in old America with just corn and water. By the way, do I think the rum would have helped? Flavor wise it would have been a nice addition, though I might personally enjoy soaking it into the cake AFTER baking, get that nice texture and ideal unctuous aroma.

20151011_201348Now obviously a lot of this result was due to how I myself ended up making it today, but still it makes me even wonder why this is in the dessert section at all. Already one debates if it actually has the clout to be on the list of French dishes, let alone on this side of the selection. The rum and a softer crumb would have eaked it closer yes, but still it tastes more like something that should be enjoyed as a Thanksgiving side dish as opposed to end-of-the-meal indulgence. My meringue didn’t help that much, though it was tasty! I swear almost nothing feels better to me in cooking than when a meringue turns out perfectly.

Possible Pairings

Now this is interesting as, I’ve already mentioned, this isn’t really much of a dessert; even if made well, still feels like a side, like a regular corn or other form of bread. So it’s hard to think of a ‘dessert alcohol pairing’ to go along with it, especially sweet items and anything from France. Truthfully I can’t think of anything that would be ‘classic’ to go alongside it.

20151015_105714But if I take it from a different direction, looking not where it is NOW but where it originally came from, the answer makes itself a little more known. I mean, why should a sweet corn ‘bread’ not be paired with that very well known, sweet-ish corn distillate? Yes, Bourbon, I believe, is the answer here. A little snifter glass of a good 9+ year bottle to sip and enjoy alongside the rich, corny baked item. It’s just a mouthful of southern US/American goodness.

Sticking along that route, we could take advantage of those so-favorite Thanksgiving-esque flavor combos, and bring some more sweetness into it, and go with a bottle of Pecan/Pecan-Pie Moonshine/Corn Whiskey. Slightly sweet, whiskey-ish, and with that nice brown sugar-pecan notes that are so reminiscent of baking spices and the we so nostalgically would enjoy alongside pumpkin and baked corn stuff. Just make sure you get a GOOD bottle, from a smaller and preferable non-nationwide, distillery and not the mass-produced moonshines; I myself got turned onto this one that our family friends from Missouri keep bringing up.